Windows 10 has a wide range of options for customizing the system interface and its settings. You can configure it according to the preferences of each user. By controlling the permissions settings for apps, you can set the necessary parameters for the execution of specific programs.
For example, you can restrict what they can do with specific data or system elements. Or conversely, allow access to all desired sources to get the most out of them. Thanks to the user-friendly, simple, and intuitive interface of Windows 10, it is very easy to customize each app.
We also recommend you the best library management software for Windows 10 to get full control of the system.
How to manage the permissions of a single app
The developers of Windows 10 have tried to collect all the controls of the operating system and individual programs in the Settings app. In this way, they are trying to completely replace the Control Panel tool.
It was responsible for all the settings of the operating system in earlier versions. to to manage the permissions of a single app in Windows 10, you need to go to its settings page. There are several ways to do this, and we’ll show you the most common ones.
1st Way: Click the “Start” button located on the “Taskbar” in the lower-left corner of the desktop and open the main Windows user menu. Using the preset settings for displaying installed programs, the shortcuts of all active apps will be presented in the custom menu.
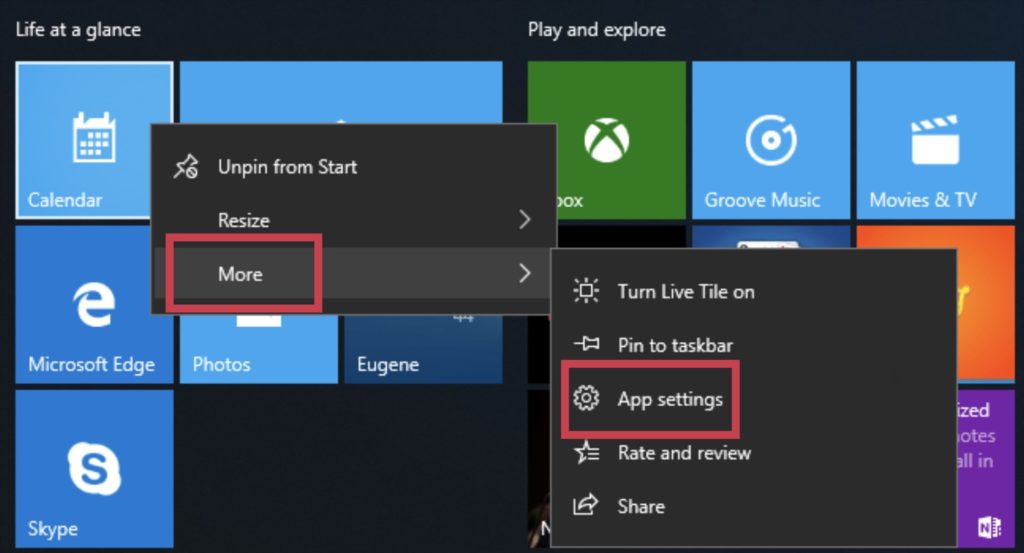
Right-click on the desired app shortcut and open the pop-up context menu. From the list of available actions, select the “More” section. Then select the “App Settings” section in the new submenu that opens.
You may also like: 9 Best Mouse Auto Mover Software for Windows 10
2nd Way: Open the “Settings” app window any way you know. For example, click the “Start” button on the “Taskbar” in the lower-left corner of the desktop.
Then in the Windows user menu that pops up, click the “Apps” button, with the gear icon on it, located in the left vertical menu bar. Or press the “Windows + I” shortcut and open the program directly. In the “Apps” window that opens, select the “Apps & features” section.
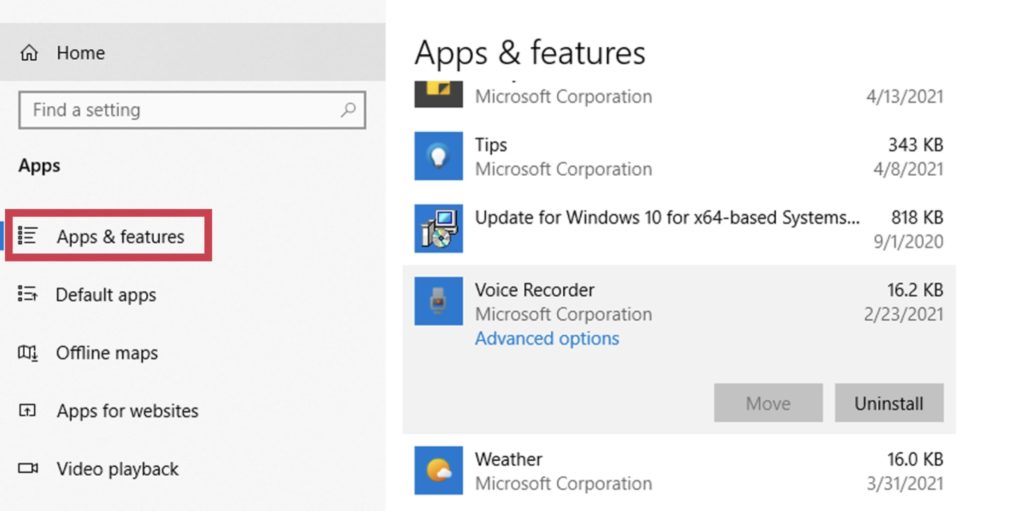
Tap on permissions you want to change once with the left mouse button to open a submenu of possible actions. Then click on the “Advanced Settings” text link.
In both cases, regardless of the selected way, users will be presented with the settings window for the chosen app. Navigating through the options window, using the scroll bar slider, you will see a list of all the permissions that the software can use.
Enable or disable app permissions to allow or deny access by the indicator, under each box of the corresponding source. Here are the permissions that are directly involved in the full functioning of the software, which data is accessed and queried by the app.
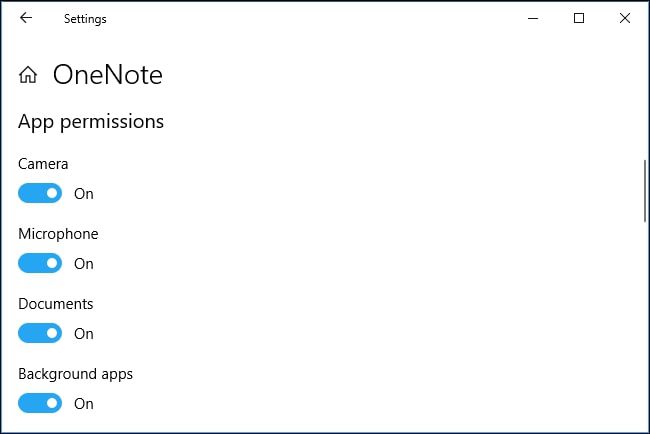
If the “Application Permissions” section is missing, then the particular program has no permissions that the user can control. It is either a modern program that does not ask for any permissions or a classic app with full access to all necessary data.
You may also like: 9 Best Store Management Software for Windows 10
How to manage permissions of the multiple applications
The developers of Windows 10 pay special attention to system security. One of the mechanisms is the ability to manage software permissions by defined categories. For instance, users can track all programs in the operating system that have access to the webcam or microphone.
To manage the allowed categories, you must open the “Settings” using the method described above or another one. For example, press the “Windows + I” key combination together. Use the scroll bar to move the slider to the bottom of the app window and select the “Privacy” section.
In the left sidebar of the section that opens, use the scroll bar to locate the “App Permissions”, among which you will need to select the item you want to configure. For instance, to see the apps that have access to your location, tap the “Location” section.
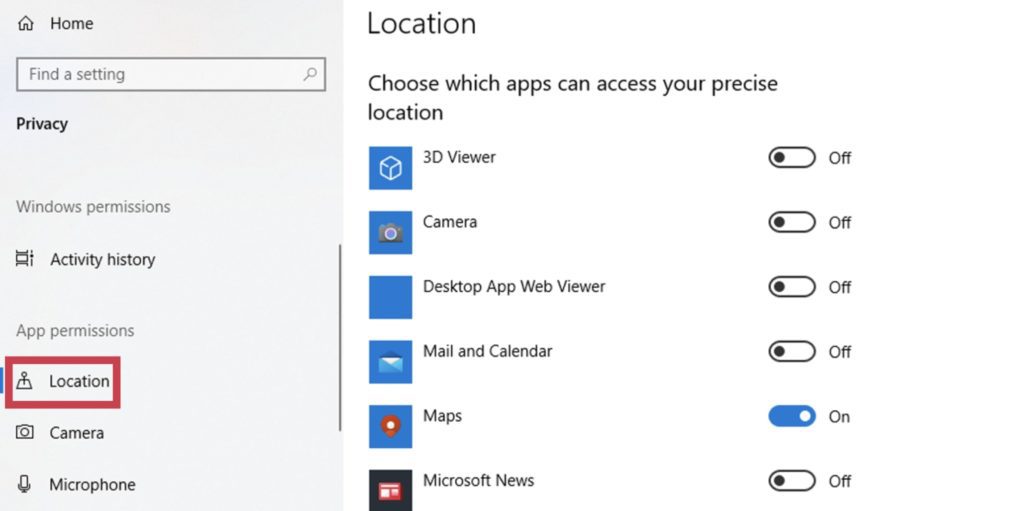
Then in the right pane, choose which apps can access your precise location. This section allows users to choose which software will have access to this type of data.
The list of app permissions shows the main sources that can be accessed by apps when they are running:
- Location
- Camera
- Microphone
- Notifications
- Account information
- Contacts
- Calendar
- Call log
- Tasks
- Messaging
- Radio
- Other devices
- Background software
- Diagnostics
- Automatic file download
- Documents
- Images
- Videos
- File System
Each permission pane contains information about what actions apps are allowed to do.
You may also like: 11 Best Dynamic Wallpaper Apps for Windows 10
The first time an app needs to use permission, it displays a request message. In it, users can allow or deny the use of particular permissions. Yet, users will then need to manage them from the “Settings” if particular permission needs to be changed.

