To make a backup of the precious photos on your iPhone or to free up space on your device, you may need to transfer photos from your iPhone to the PC. This job can be easily done by using iTunes, but it is the least choice for you.
Why? Because iTunes doesn’t provide you with a convenient and direct way to do it. Even worse, iTunes crashes very often, which makes it possible to lose data on your iPhone.
You may also like: How to Check My Printer History
Thus, using some iTunes alternative ways to get this work done is necessary. Luckily, this guide will give you information on how to transfer photos from iPhone to PC without iTunes. Read on to get the details.
Method 1: Copy all photos from iPhone to the computer with special software
Solution 1: EaseUS MobiMover
As an iOS 8/9/10/11/12/13 data transfer tool, EaseUS MobiMover can help you transfer photos from iPhone to PC without iTunes. Apart from data transfer, it also offers you the option to manage iOS data and download videos/audios to your computer or iPhone/iPad.
For example, you can delete iPhone photos from your PC to manage your data more easily or download Vimeo videos to your iPhone to enjoy TV shows or movies offline.
Additionally, with EaseUS MobiMover, the versatile software for iOS data transfer, installed on your PC (also compatible with Mac), you can:
- Transfer photos from your iPhone to PC running Windows 7 and later all at once or selectively.
- Copy all photos from Photo Library, Camera Roll, Screenshots, and other albums.
- Import photos from PC to iPhone or sync photos from iPhone to iPhone.
You may also like: How to Recover Deleted Google History on Android
Now, safely and quickly get EaseUS MobiMover installed on your computer running Windows 10/8/7 by clicking the button below and learn how to transfer pictures from iPhone to PC in three steps only.
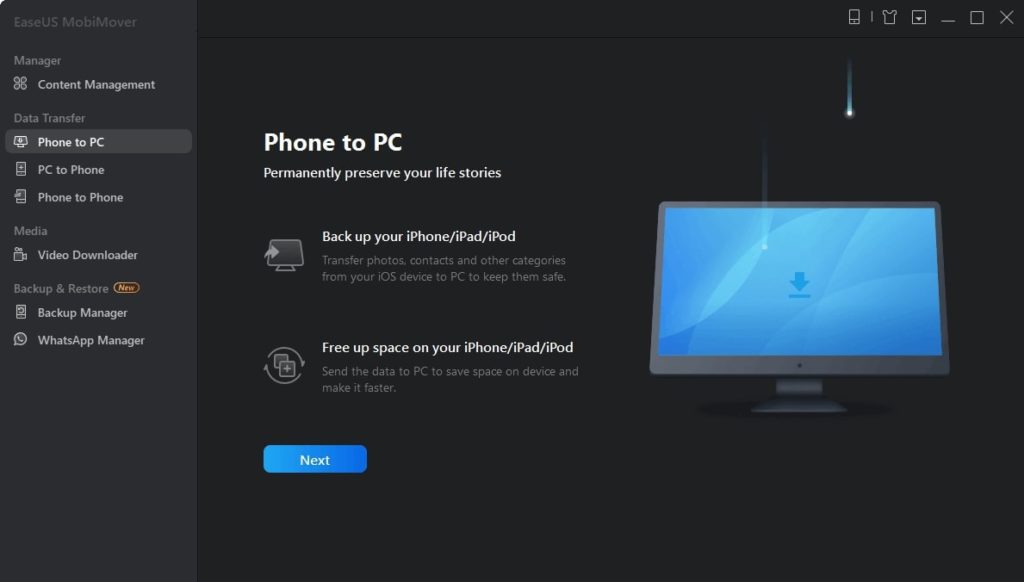
- Step 1: Connect your iPhone to PC running Windows 7 or later. Run EaseUS MobiMover, choose Phone to PC and click the Next button to go on.
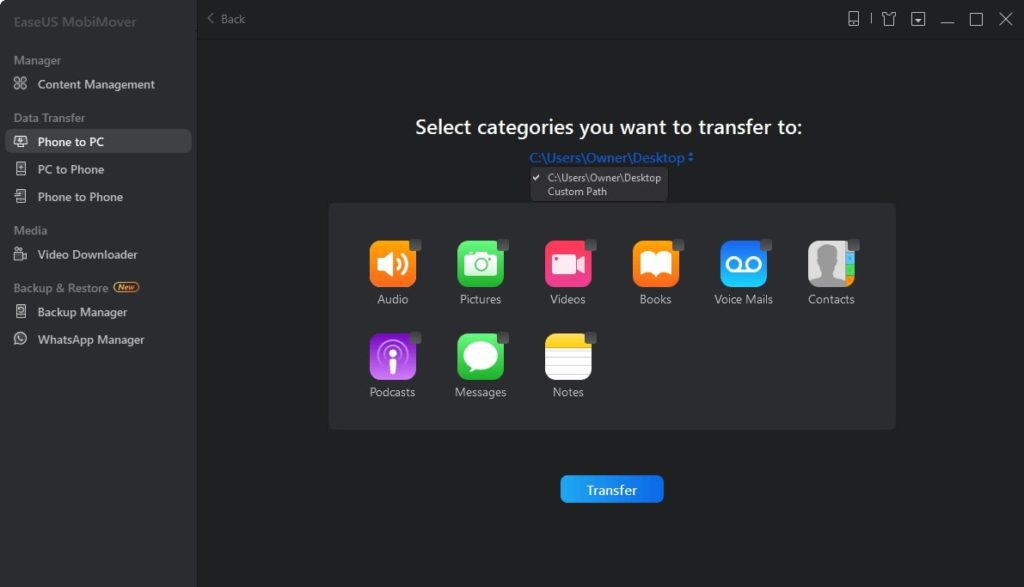
- Step 2: Check the category/categories you want to transfer from your iPhone to the computer. As you can see, you can copy other supported files together with photos from your iPhone to PC all at once. Besides, you can customize the storage path for the exported photos. Otherwise, MobiMover will save them on your desktop.
- Step 3: Now, click the Transfer button to start transferring photos from your iPhone to PC without iTunes. Exporting files from iPhone to PC with MobiMover is the right way for backup to avoid unexpected data loss.
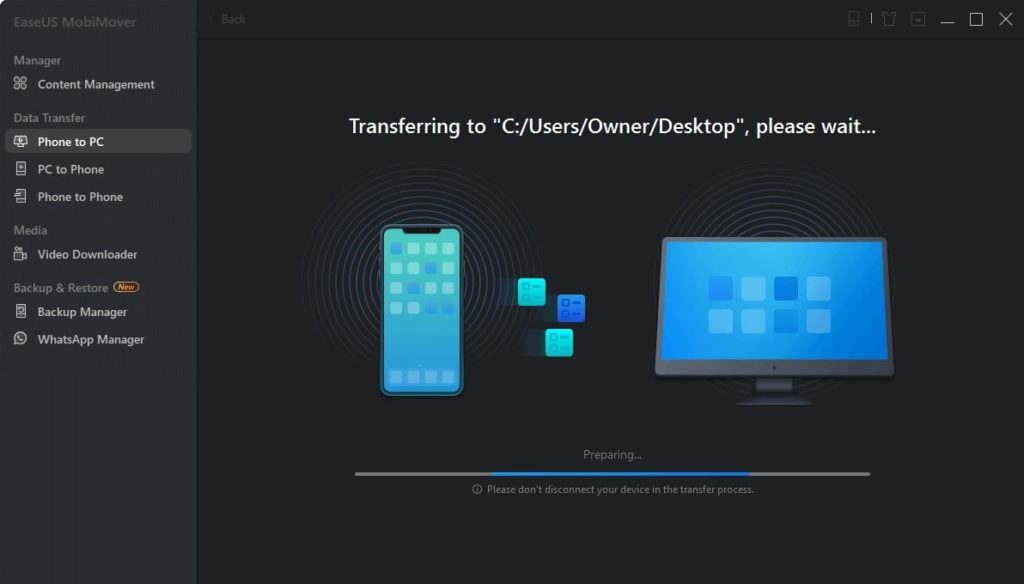
Using similar steps, things like saving iPhone text messages from iPhone to the computer, transferring iPhone songs to PC, back up contacts on the iPhone, and more can be done effortlessly. Don’t hesitate to give it a try.
You may also like: 9 Best Apps to Remove Glare from Photos on Android & iOS
Solution 2: PanFone Free Mobile Phone Manager
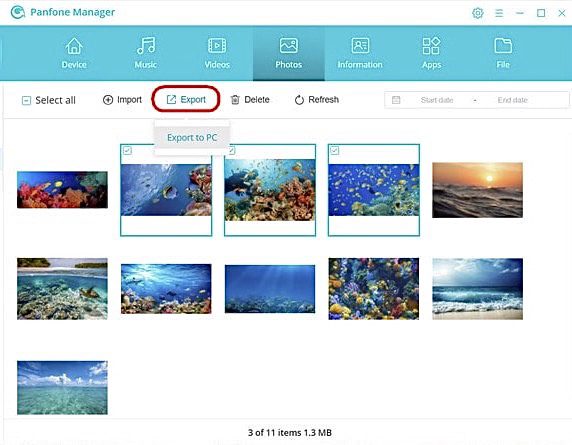
PanFone Free Mobile Phone Manager is a free tool that can help you to transfer certain photos you prefer from your iPhone to the computer. You can preview the photos in it and transfer photos so easily with 2 steps. At first, download and install this Free Mobile Phone Manager on your computer.
- Step 1: Run this program and get your iPhone connected to the computer. Connect your iPhone with a USB cable and PanFone would detect your device automatically.
- Step 2: Select photos or albums you’d like to transfer to your computer. You can transfer all photo albums to your computer or transfer photos selectively.
Export the photo album from your iPhone to the computer:
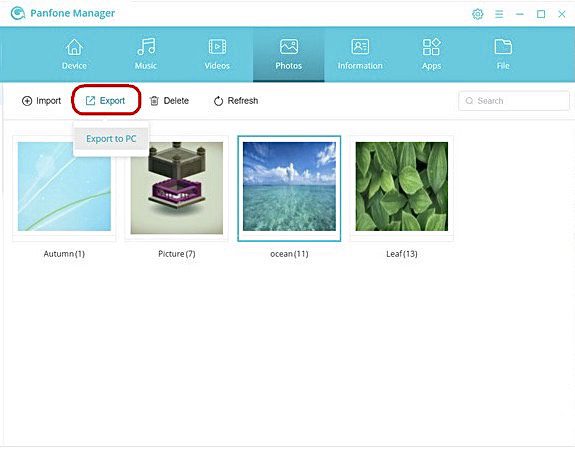
Once your iPhone is connected successfully, clap the Photos tab. All albums of the iPhone will be listed. Simply select a certain album and then click on the Export button. The photo album will be transferred to a computer.
Export specific photos from your iPhone to the computer:
Open one specific album. Select multiple photos and click on the Export button on the menu bar. Then do the same operation as we mentioned above.
Solution 3: PanFone Mobile Data Transfer
If you do not want to transfer photos selectively, here is another way to copy all photos on iPhone to a PC at one time. Here is another tool — PanFone Mobile Data Transfer.
You may also like: How to Manage Safari Power Saver Tool
This is a tool designed for transferring data among iOS devices, Android devices, iCloud, iTunes, and computers. You can download it by clicking the following button.
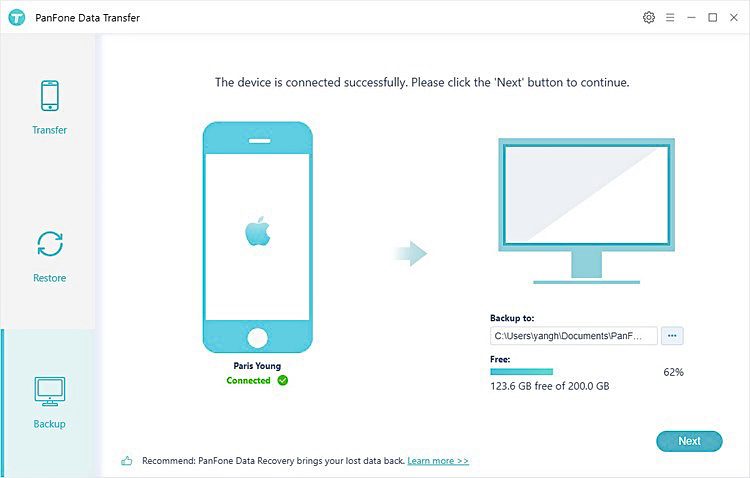
- Step 1: Start PanFone Data Transfer and connect your iPhone to the computer. Connect your iPhone to the computer via USB cable and PanFone would recognize your phone automatically.
- Step 2: Select the Backup option to bring up the one-click backup panel.
Once your iPhone gets detected, simply select the Backup option and then click on the Next button to go ahead.
- Step 3: Tick off Camera Roll and Photo Library on the check box, then click on Next to start loading.
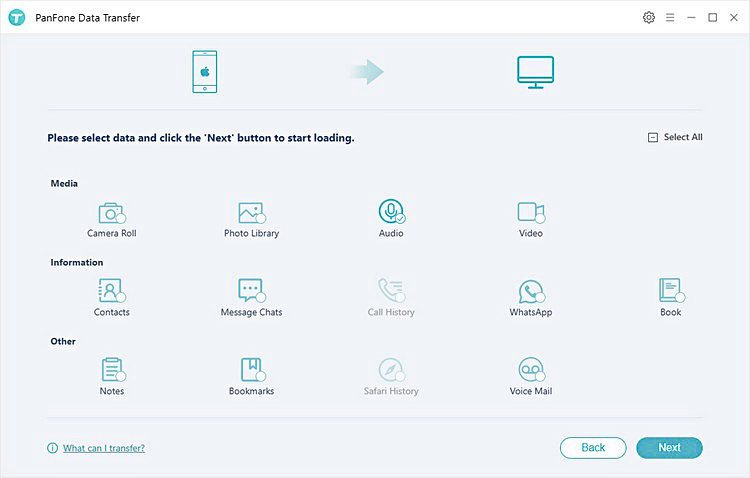
After the loading process is complete, click on Next to start the backup process.
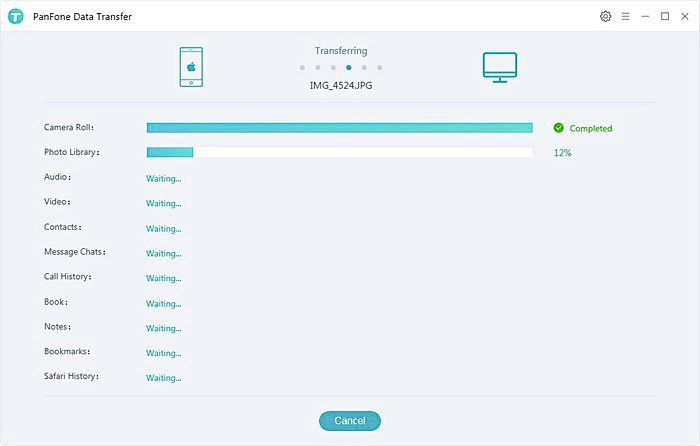
After a while, all photos will be transferred from your iPhone to the computer.
Method 2: Transfer photos from iPhone to PC running Windows 10 using the Photos app
If you own a PC running Windows 10, you can take this method to transfer photos from iPhone to PC running Windows 10 using the Photos app.
- Step 1: Connect your iPhone to the computer with a USB cable.
- Step 2: If you are the first time to connect your device to this computer, you will need to tap Allow on your iPhone to allow the computer to access the iPhone.
- Step 3: Open the Photos app on your PC by using the Windows Start menu or search bar.
- Step 4: After the Photos app is opened, click the Import button in the upper right corner of your screen. In the drop-down menu, just select the From a USB device.
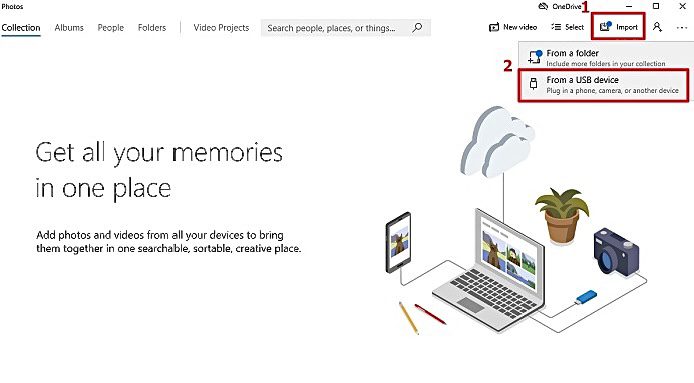
- Step 5: Select the pictures you want to transfer to Windows 10 and click on the Import button to start the transfer. If your Photos app crashes here, just use some useful solutions to fix the Windows not working issue, or you can also try the alternative methods listed in this guide.
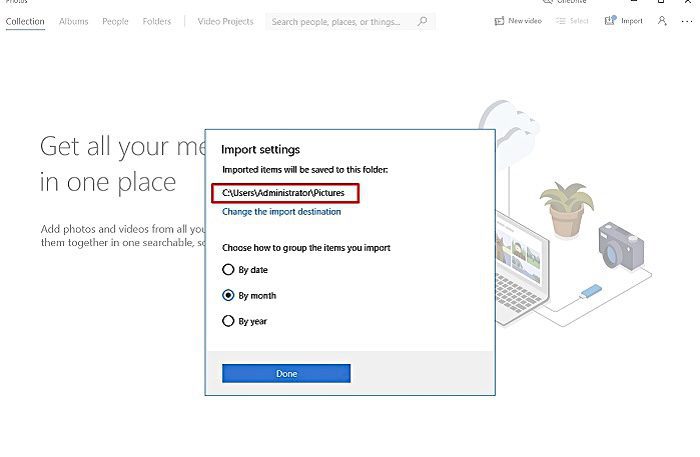
- Step 6: If you want to see where these photos are stored, you can click the Import Settings, from where you can easily see the location of photos, change the import destination, or choose the way to group the items you import.
Method 3: Transfer photos from iPhone to PC running Windows 7/8/10 using Windows Explorer
Windows Explorer (called File Explorer in Windows 10) is another option that allows you to transfer photos from iPhone to PC without iTunes or any other software.
By using this method, all your pictures and videos will be contained in one folder instead of an album, which makes it difficult for you to transfer specific photos.
Tip 1: Transfer all pictures and videos from iPhone to PC
- Step 1: Unlock your iPhone and connect it to your PC. When a prompt pops up on your iPhone asking you whether to trust this computer, click Trust.
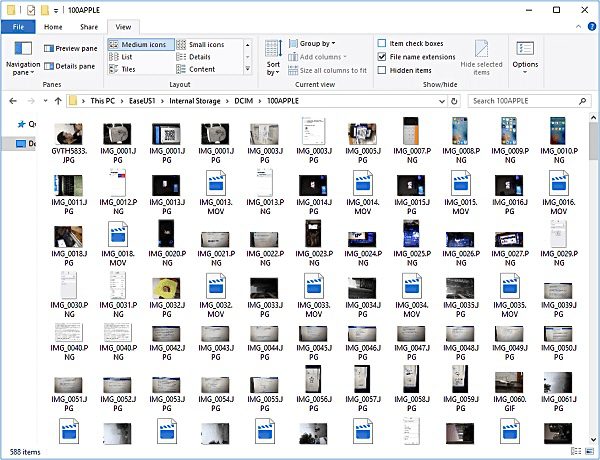
- Step 2: Open This PC on your computer, go to “[your iPhone name] > Internal Storage > DCIM > 100APPLE“.
- Step 3: Choose to copy the whole folder or some items from your iPhone to your computer according to your needs.
Tip 2: Import photos and videos from iPhone to PC
- Step 1: Unlock your iPhone and connect it to your PC. When a prompt appears on your iPhone asking you whether to trust this computer, click Trust.
- Step 2: Open This PC, right-click your “device name” and choose Import pictures and videos.
- Step 3: In the pop-up window, select Review, organize, and group items to import or Import all new items now.
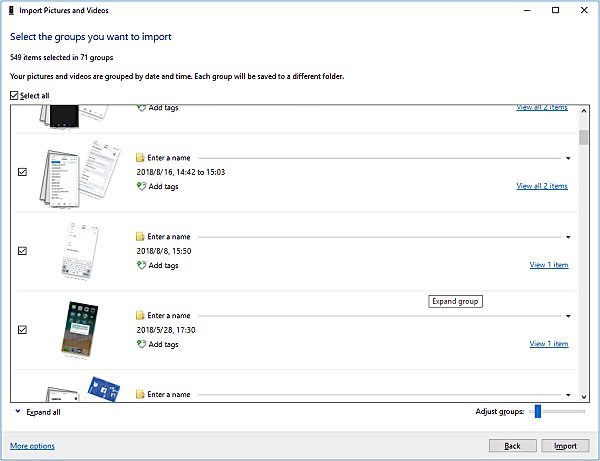
- Step 4: If you choose the former option, you will see your iPhone photos and videos grouped by date and item, and you can select the folders/files to import as you like. If you choose the latter, the importing process will start automatically.
Remember, if the iPhone pictures are not showing up in Windows, make sure the iPhone is unlocked first.
You may also like: How to Install Private Channels On Fire Stick (Complete guide)
Method 4: Copy pictures from iPhone to PC without iTunes via iCloud
If you have less than 5GB of photos and videos to upload from your iPhone to the computer, then using Apple’s iCloud service is a great option. The process of importing photos is very slightly different depending on whether you have downloaded iCloud for Windows.
If you have downloaded iCloud for Windows, then you’ll need our first option, and if you haven’t downloaded iCloud for Windows you’ll need the second. Before using either of them, first of all, you’ll need to enable iCloud Photo Library on your iPhone.
Here’s how to do it. Go to “Settings > [your name] > iCloud > Photos” and turn on “iCloud Photo Library” on your iPhone, then follow one of the tips below to copy photos from your iPhone to your PC.
Option 1: Sync photos from iPhone to PC via iCloud Control Panel
- Step 1: Run iCloud for Windows on your computer.
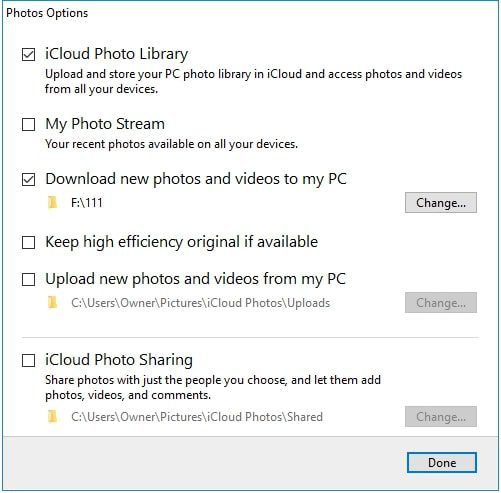
- Step 2: Click Options next to Photos and enable iCloud Photo Library.
- Step 3: Make sure the Download new photos and videos to my PC is turned on. If you need to change the location of uploaded photos, tap on Change under this option to set another storage path for your iPhone photos. (If you need to transfer photos from your PC to your iPhone, click the checkbox next to the Upload new photos and videos from my PC option.)
- Step 4: Then your iPhone photos will be copied to your computer when there is WiFi available.
Option 2: Download iPhone photos to computer via iCloud.com
- Step 1: Go to visit iCloud.com from your PC.
- Step 2: Enter your Apple ID to sign in to iCloud. (Make sure you have signed in to iCloud on your iDevice and computer with the same Apple ID.)
- Step 3: Choose Photos among the options.
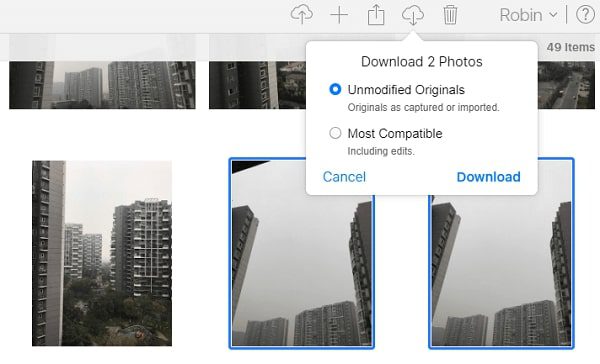
- Step 4: Select the photos you’d like to download from iCloud to your PC and then click the Download Selected items icon at the top right corner of your screen. (Press Alt to select multiple items.)
Method 5: Send images from iPhone to PC via email
It’s much easier to send images from iPhone to PC by email. Simply send an email that contains the photos you want to copy to yourself, then check the mail on your computer and download the items. Here are the detailed steps.
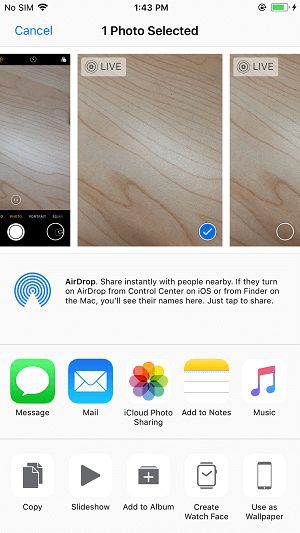
- Step 1: Go to the Photos app on your iPhone.
- Step 2: Choose the album and select the photos you want to transfer from your iPhone to the PC.
- Step 3: Tap on the share button and choose Mail.
- Step 4: Enter the information needed and click Send.
- Step 5: Check the email on your computer and download the photos to it.
Method 6: Import pictures from iPhone to computer with cloud service
Apart from the methods mentioned above, cloud services like Dropbox, Google Drive, and Microsoft OneDrive also offer photo-upload services. But most of them have limits on storage space – 2GB for Dropbox, 7GB for OneDrive, and 15 GB for Google OneDrive.
You have to purchase more space if you have a lot of photos and videos to transfer, which might cost you a small fortune. If you are a budget user, then you can go back to use Method 1 to transfer photos from iPhone to PC without limit on storage (Depending on your computer’s storage).
Here we will take Dropbox and Google Photos, for example.
Solution 1: Dropbox
Not a fan of iCloud? You can upload your images to Dropbox instead. Dropbox is a good alternative app that allows you to easily access photos, documents, and more across any device within the Dropbox app or in a browser.
There is also an option to set up the app to automatically connect photos to Dropbox, which means those photos are accessible from your computer anytime.
Manual Upload
First, make sure you have the Dropbox iOS app downloaded from the app store on your iPhone. Please note that you have to create an account with Dropbox first.
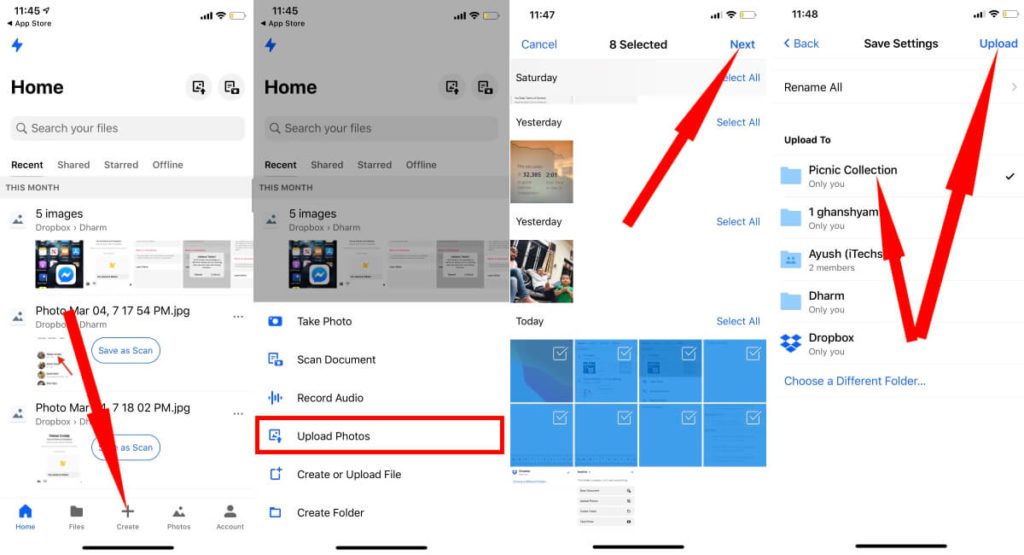
Then, select the folder you want your picture to go in under Files. At the bottom of your screen, tap the Create button. After selecting Upload Photos, choose the photos you want to transfer to Dropbox and tap Upload.
There are different choices as to how to navigate Dropbox on your computer. You can choose to download the Dropbox app to your computer, or you can go to the Dropbox website in your preferred browser and log in.
From there, your recently synced photos will be available in the folder that you initially chose to store them in. You can then download any photos you want from Dropbox to your computer.
Automatic Upload
If you’d like to keep your photos backed up at all times, then the second option is for you. Dropbox also offers an automatic backup system as long as you know which functions to turn on.
After navigating to your Settings in the Dropbox app, select the Camera Upload. Turn on your Camera Upload and you’re set to go.
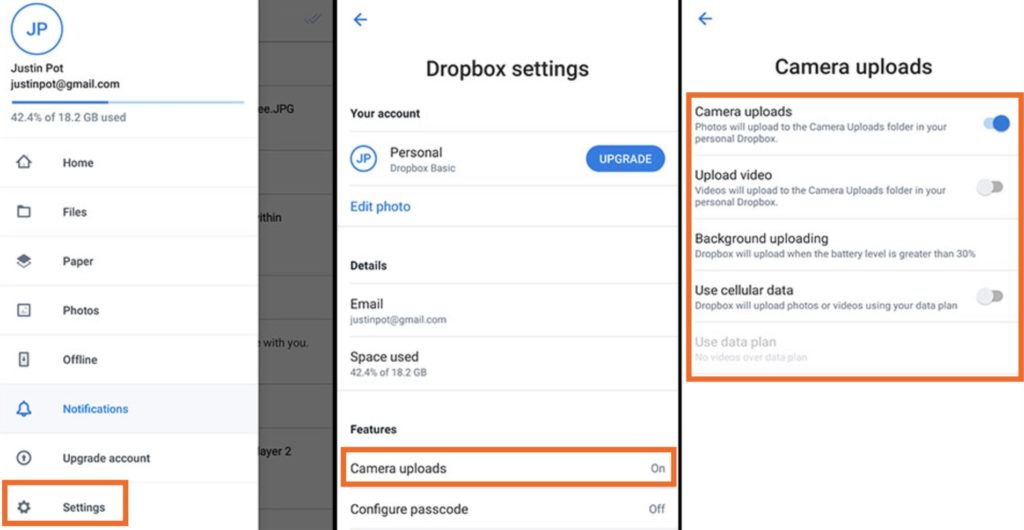
With this setting, any new photos taken will be automatically uploaded to the Camera Uploads folder in your Dropbox, which you can access via your computer on the Dropbox website. Dropbox offers limited space for free.
A Dropbox Basic account gives you 2 GB. For additional space and features, select from the Dropbox Plus, Dropbox Professional, or Dropbox Business plan. The prices will vary according to the plan you choose.
Another issue that Dropbox users tend to face is that the uploaded photos may at first appear to be of lower resolution than the original. However, the photos uploaded to Dropbox are uploaded in their original resolution.
If you’re viewing these files through the Dropbox website, then what you’re seeing is just a preview of the original file. The original, unmodified file will be seen in its full resolution when downloaded and opened on a computer.
Solution 2: Google Photos
The difference between Dropbox and Google Photos is that Google Photos provides unlimited space for all of your pictures as long as each photo is under 16 megapixels (and for videos 1080p or less). Similar to Dropbox, you can set it up so that your pictures sync manually or automatically.
Manual Upload
After downloading Google Photos on your iPhone, open the Google Photos app to log in. For first-timers using the app, Photos will ask to access your photos. Make sure you allow access or you will not be able to transfer photos over to your computer.
Navigate your screen to Photos and tap on the Library button at the bottom of the screen. Here, you can choose to create a new album or select your photos.
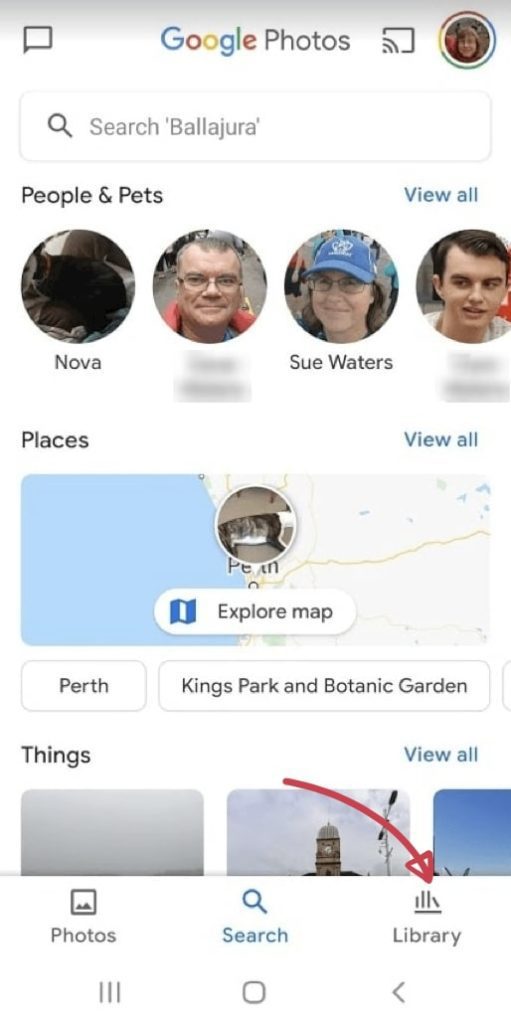
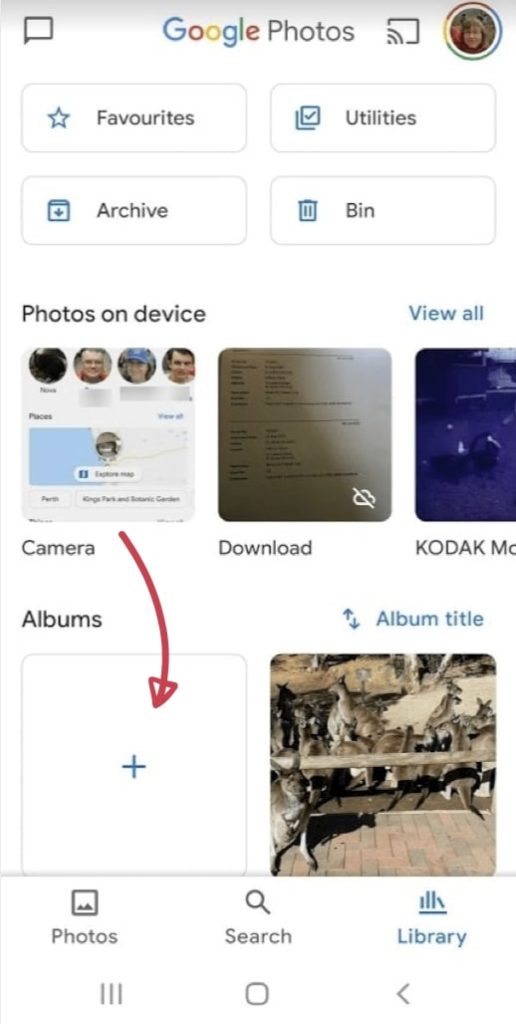
Once you’ve selected the photos you want to upload, tap Done. When you’re creating a new album, you’ll be prompted to name the album as your photos are processing for upload.
If you chose to select Photos, check the photos you want to upload. Then, continue to tap the three dots in the upper corner before selecting the option to backup while the photos are uploading.
You will find that the pictures you uploaded will be there on your computer when you open Google Photos.
Automatic Upload
Once again, if it’s your first time using the app, it will ask for permission to access your photos. After pressing on the top right-hand corner, tap on Settings. Select Backup & Sync, and turn it on.
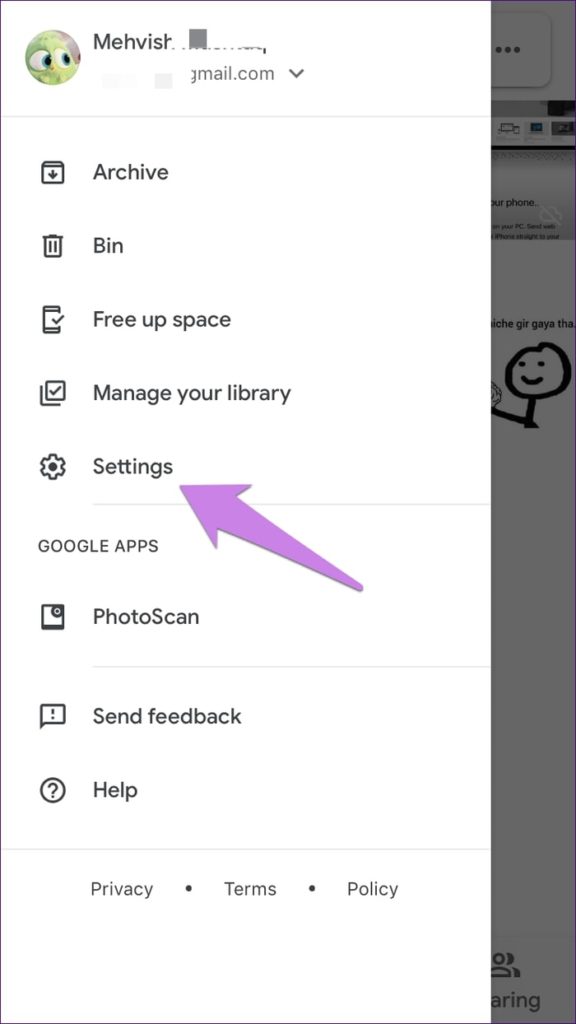
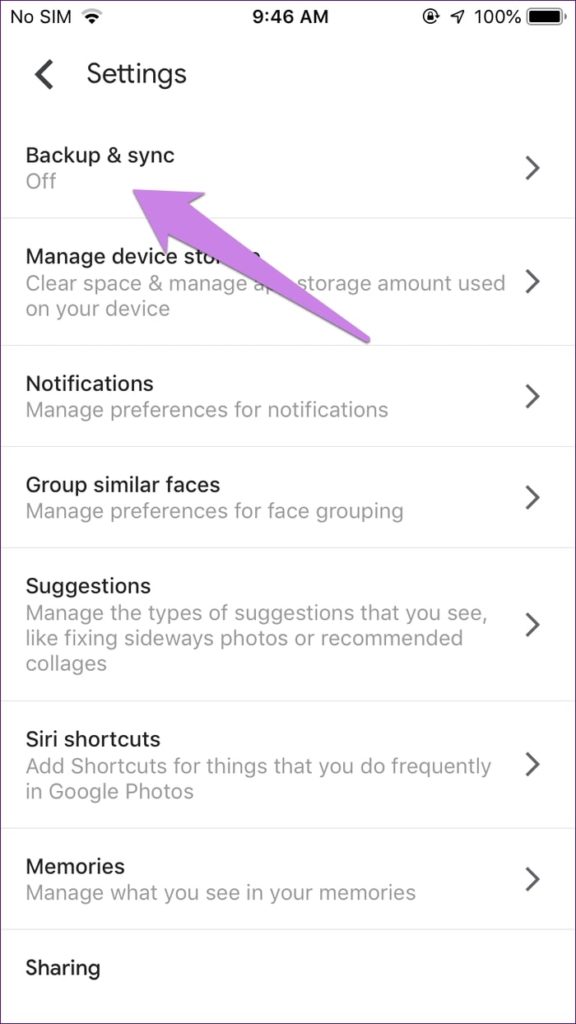

Your photos will begin backing up and syncing to Google Photos. After all, the photos in your iPhone are synced, you can access Google Photos on your computer and see them sorted by date.
Google Photos gives you unlimited space and is free for all to use, as long as all your uploaded photos are within 16 megapixels of resolution. However, it is a good alternative to Dropbox if you don’t mind storing your photos in low-res.

